
After playing the character since release against all types of players and learning everything there is to learn about him, I painstakingly created a Complete Ghostface Guide for ya’lls.
Contents
Ghostface Character Guide
All credit goes to Bubba Tea!
Overview
- Ghostface is a fairly complex killer and needs to be played differently from the other killers.
- He’s different from the other killers because he has little chase potential. Rather, the skill involves tracking and predicting survivor movements without the need for a lengthy chase.
Difficulty
How difficult is Ghostface? While not the most mechanically-difficult killer, he’s pretty difficult to pick up and requires a hefty understanding of his power, maps, and how survivors play. Mastering this killer definitely takes a lot of practice. You might experience a lot of frustration as you get broken out of stealth for the hundredth time, or when you accidentally mark someone you didn’t intend to.
Gameplay Strategies
- When stalking, what you need to be doing is 99ing (stalking people until right before their stalk meter is complete), and then finish the stalk when you’re right next to them. You should almost never mark people from a distance. (don’t listen to the pic above; never fully stalk people from far away).
- Take Whispers. It’s probably his best perk. You can remain in cover and patrol gens from a distance. Take some time to learn how Whispers works in order to use it to its max potential.
- If you’re playing him efficiently, you probably won’t end up hooking everyone 3 times. Instead, by 99ing some people and injuring others, you have an opportunity to set up a snowball and downing many people in the span of a few minutes. I’ll explain later.
- Never walk out into the open, if you can avoid it. Instead, hug walls and debris. If you think a survivor is in the area, lean out from cover and scan the area of them. If you see someone, stalk them to 99%. If they’re heading towards a gen, then follow through and down them, but if they’re not, then just leave them for now and go back to patrolling your gens.
- Stalk people from as far away as you possibly can; it’ll be much harder for you to get noticed, let alone revealed. Don’t stalk people from 5 feet away and expect them not to notice you. I cannot understate how important this is; this is the best thing you can do to avoid getting seen, let alone broken out of stealth. It’ll also save time by preventing you from straying from your generator patrol route, should you choose to save the stalked survivor for later. This is the main reason I love using Whispers on GF.
- Stalking through corn: You can stalk people up to about 15 meters away through corn and still usually remain unnoticed. Crouch this distance away from them and circle the survivor while holding the stalk button until you find a spot you can stalk. However, you can’t even lean while stalking this way, making it kinda inefficient. The survivor also has to be completely stationary (i.e. on gens / totems) for this to work. On the bright side, it’s almost impossible to get revealed through corn, so if someone else happens to see you, then just crouch-walk away from them.
- Crouching mindgames: There are certain loops which you can mindgame by crouching and moonwalking to hide your Stain, and jump the survivor from an unexpected direction. You don’t need to be in stealth to do this. However, this won’t work on all loops. You can do it if the loop is about as tall as your shoulder (Ex: some of the stone loops on the Temple of Purgation).
- “No stalk” Ghostface (Sloppy / Thana / Ruin / Nurses Calling): A good noob stomper but not much else. Not only is this such a lame way to play, it won’t even be that effective against good survivors since you won’t be able to end chases quickly enough. The worst part is that you can’t even abandon the chase right away since your power has yet to recover (unless you’re using the best two recovery addons). And if you do leave, SWF will let their friends know. I don’t like anything about this playstyle. It does work decently well on indoor maps, where you can jump survivors from almost anywhere, And works a lot less on more open maps. And even then, maps like the Game have strong loops where you can’t follow up and actually down a survivor.
Preferred Build / Gameplay Method
1. After trying different builds and swapping out perks, I’ve settled with Corrupt Intervention, Barbecue and Chili, Sloppy Butcher and Whispers.
- Corrupt Intervention-Massively reduces the map size at the start of the game, and makes it easy to set patrol route to find survivors.
- BBQ-lets me know who’s nearby and the exact locations of those far away. I won’t always go straight to a person in the distance, but it helps me keep tabs on them and predict who’ll be the one to come for a rescue.
- Whispers-very useful at the start of the match when patrolling gens. Allows me to stalk people from a distance and reduces the chances of me getting seen. Also takes the place of Nurse’s Calling for me; if you know there’s someone healing in the area, use Whispers and pay attention to healing noises to pinpoint their location.
- Sloppy Butcher-A great pressure perk rather than a timewaster, since many skilled players will often neglect healing in order to finish the gens, even against a Ghostface. People who get injured are more likely to stay that way than without this perk.
You can run whatever you prefer of course, this is just my preferred build after testing many perks. If you’re newer to the killer, I highly recommend running more slowdown perks like Ruin or Pop Goes the Weasel.
2. Before the match starts, I learn the names of the survivors to help me know later on who exactly it is I’m stalking. If there’s 4 blendettes then it’s a GG for me (not really but it does get more difficult).
3. I set a patrol route to my 4 gens where I stalk them from a distance and keep moving. Corrupt Intervention lets me patrol a small area without exposing myself to the survivors. If nobody touches a gen for a while, I venture further out of the gen area and Whispers will tell me where they are. This rarely ever occurs.
4. If the map allows it, I often like to go to an elevated platform / building and move around until Whispers activates, at which point I’ll stalk through the windows in that area. I’ll almost always catch a survivor running to one of the open gens (since the further gens are still blocked). I’ll 99 stalk this person and leave them for the moment, if they aren’t approaching a gen. Other structures include the tractors on Coldwind. However, small hills don’t count-never attempt to stalk from these. There is no cover and you’ll likely get seen, if not broken out of stealth.
5. I’ll soon catch someone working on a gen and hopefully mark and down them quickly. If I see more people nearby that I haven’t stalked, I’ll try to injure them and spread damage before hooking the original downed survivor. This is especially important as it makes the other stalked survivors more likely to come for the save and putting themselves in a bad position. In fact, the ideal GF situation is where most people are injured but 1 or 2 people are healthy but almost fully stalked. Now I know exactly who will come for the save, since few injured survivors would want to attempt a rescue with a wild Ghostface on the loose. BBQ and Chili will show me their exact location and if they look like they’re about to come for a rescue, I can intercept them. Now with the healthy survivors downed, it really puts pressure on the injured survivors, and I can either hook the person I just downed or go after the injured people. This is how you can snowball with GF and win the game in a single decisive moment.
You might think that this is unreliable because survivors can just hide in lockers to counter BBQ. Yes, they can, but not many people hide in lockers against a ghostface unless they’re the only ones left.
6. Sloppy Butcher is actually very important for this playstyle to work; without it, everyone often ends up healing before you have time to down another survivor, making it difficult to predict their next movements. Many people at high ranks neglect healing if this perk is involved, so there’ll be a few people injured most of the time, making it easier to predict who will possibly come to rescue a teammate and who will remain on a faraway gen.
Other Good Perks
- Ruin: A decent perk on any killer, but pretty inconsistent, as survivors can find the totem quickly or simply just work through it. As you climb up the ranks, you might notice that Ruin becomes less and less effective; it lasts less and survivors actually know how to hit great skill checks. I like Corrupt Intervention a lot better.
- Pop Goes the Weasel: With how quickly you can down people with GF, you’re bound to get good use out of it.
- Discordance: An alternative to Whispers if you don’t like using it, also will let you stalk multiple people at once. I still like Whispers better though.
- Nurse’s Calling: A pretty good perk, but if you have skills you can find them anyway with Whispers. If you think there are people healing in the area, use Whispers to track them down and pay attention to healing noises nearby.
- Spies from the Shadows: A discount Whispers, lets you know where exactly a nearby survivor is. The best part is that no one will expect you to run this perk lol.
- Rancor: Lets you know where everyone is, but unfortunately it can only be used up to 5 times a match. Although you do get a bit of insurance with the kill at the end.
- Surge / Surveillance: A very nifty perk combo; Surge will regress all nearby gens when you down a survivor, and Surveillance will let you know when the gen has been touched again, allowing you to creep up and stalk the gen. Also saves you time by eliminating the need to kick gens, and knowing exactly which gens to patrol.
Do you notice a bit of a trend here? Always take a few tracking perks to enhance your ghostface gameplay. You need to know where the survivors are, you never want to haphazardly stumble onto one. This is one factor that separates the good ghostfaces from the weaker ones. Use these perks along with your predictions to one day become a god ghostie.
You can also do well with instadown perks, such as Haunted Grounds or Make Your Choice, as survivors will never hear you coming and you can down them in one hit.
Preferred Addons
His stalk recovery addons are the best (Chewed Pen/Address Book/Walleyes Matchbook), followed by increased stalk speed when not leaning (Monocular, Belt Clip, Philly). Of the ultra rares, the Security Camera can be very useful, while the Tape usually isn’t necessary, as lean stalks are very fast to begin with. Faster crouch speed addons aren’t terrible. The lower reveal range addons (License/Detailed Routine) sound good on paper, but playing Ghostface effectively means you won’t even be seen until it’s too late, thus making them unnecessary as well. Faster movement speed while stalking and longer Killer Instinct addons are both pretty useless.


Map Tier List
Ghostface is a pretty map-dependent killer, so here’s a rating of all the maps in the game.
S
- The Underground Complex: You should almost never lose on this map. The weak loops along with your indoor stealth power will make you unbeatable.
A
- Gideon Meat Plant: (A+) Indoor, similar to Lery’s but with more accessible gens because smaller map.
- Treatment Theater: (A+) Indoor map=good cover as well as an easily defendable center gen.
- Sanctum of Wrath: (A) A tall platform gives you visibility of a vast portion of the map, and the plants, statues, and poor lighting hide your approach. My personal favorite map for GF.
- Pale Rose: (A) Big boat makes you Mr. Worldwide, dark lighting and good cover.
- Shelter Woods: (A-) Decent cover, dim lighting, few loops. A good map for most killers.
- Disturbed Ward: (A-) Actually a decent map, the asylum gives you a view of nearly the entire map, and stalking through the grates on the second floor makes it nearly impossible to be spotted.
- Azarov’s Resting Place: (A-) Basic loops with a survivor sided middle zone, but it’s easy to split the survivors. A good situation to be in as GF is to have the dying survs at one part of the map with everyone else really far away. You can patrol the middle of the map and accumulate stalk on passing survivors, and set up for a snowball.
B
- Family Residence: (B+) Pretty easy to hide and get stalks. Much larger than Sanctum and lacks the tall platform, hence a worse map.
- Mother’s Dwelling: (B) Decent main building but one of the largest maps in the game.
- Mount Ormond Resort: (B) Decent cover and the building provides a nice view of the map. There are some really good survivor loops though.
- Grim Pantry: (B) Strong loops at the central structure, but you can also use it to stalk people afar.
- Father Campbell’s Chapel: (B) Not too shabby, you can chill at the main building while also guarding that gen from the other side.
- Wrecker’s Yard: (B) An average score for an average map.
- Wretched Shop: (B) Basic loops and a decent ability to stalk the building gen, making that loop pretty ineffective.
- Suffocation Pit: (B) Decent map and cover, some cheeky stalk points, just don’t get looped around the big building.
- Ironworks of Misery: (B) Tall building with windows for EZ stalks, though the same building has one of the worst loops. Not a bad map overall.
- Groaning Storehouse: (B) You can actually stalk the building gen pretty effectively from the outside, and also use it to stalk and traverse to different regions of the map unseen.
- Coal Tower: (B-) Good survivor loops and a pretty weak building at the edge of the map. Just your run-of-the-mill map, less trash than trash tier.
- Gas Heaven: (B-) There are many gens in the center area of the map with good loops nearby, and not a lot of cover. It’s also pretty annoying to stalk from behind those small cars, as you’re pretty visible when standing up.
- Torment Creek: (B-) Probably one of the better Coldwind maps, you can creep around the main building, and less corn=better stalks.
- Temple of Purgation: (B-) Mother’s Dwelling but without the building. Though there are some loops tall enough to mindgame by crouching.
- Badham Preschool: (B-) Although there’s pretty decent cover, a lot of the gens are located in corners or behind bushes, making it hard to stalk there. There are, however, some nice stalking spots (explained in the section below).
C
- Lampkin Lane: (C+) Pretty hard to stalk at many indoor gens, and some are situated with a full view of the stairs, making it impossible to catch anybody there.
- Thompson House: (C) Better than Rotten Fields because of the ability to stalk from the house (even the patio is high enough to get a decent view of the map) but still kinda a pain.
- Fractured Cowshed: (C) Not as large as Rotten Fields but painful loops regardless. The building is still counterable though.
D
- Rotten Fields: Very large and stalking through corn is pretty inefficient, though possible. A good amount of strong loops like the cow tree and plenty of jungle gyms.
F
- Blood Lodge: (F) Not many good places to hide and the gens are mostly nestled in extremely safe loops.
- Rancid Abattoir: (F) Cornstalking is necessary with an abomination of a main building. Why is this even in the game?
Playing as Survivor
How to counter
No-stalk playstyle
- A recently popularized build encourages playing ghostface without stalking at all, just hit and run the survivors. I’m not a fan of this playstyle, and it’s definitely counterable. Many of these ghostface players won’t commit to the kill if you loop them long enough, and will eventually leave and go into stealth. Now you need to focus on breaking them out as they’re leaving. Follow them until you break them out again. Think of yourself as their babysitter; they can’t run off killing people if you’re watching them like a hawk.
- Therefore I do not recommend playing as no stalk GF.
Stalkers
- If you’re being stalked and the killer is very close, run through him as he can’t stalk you if you’re in his character model, but you can still break him out of stealth. If he’s far away, hide behind cover. If you think you’re 99’d take hits by blocking hooks. Most importantly, keep your eyes peeled!
Perks
- Spine Chill: A pretty effective anti-ghostie perk. As killer, if you suspect someone might run this perk (if they run away a lot sooner than you’d expect) you can counter this by moonwalking up to them. Also, it doesn’t inform the survivor of your direction, so if you approach them from an unexpected angle, they might even run into you. You’d be surprised at how often this occurs.
- Object of Obsession: Still very effective against ghostie if used correctly. Do you notice how the perk lights up as soon as the killer is on the edge of your screen? Repeatedly rotate your camera slowly so that the perk keeps turning on and off. Find the point where this occurs and you know ghostie’s exact direction.
– You can counter OoO as GF by heading towards your obsession in a straight line while blocking line of sight, since this might convey the impression that you’re still far away, so the direction their OoO lights up will change less. Don’t circle them, because your rapidly changing direction will inform them that you’re nearby. - Sprint Burst: Probably the most effective one here, and my least favorite to go against as ghostie. Pretty easy to use, just run away if you see him coming.
- Kindred: While you won’t be seeing the killer all the time, you can see him after he hooks someone and you’ll have a good idea of where he’ll be next, allowing you to act accordingly.
- Unbreakable: This could be a damper to any slugface’s plans, and can allow you to singlehandedly save your team. As ghostface, however, unless the game is in its final stages *with the last gen nearly finished), it shouldn’t be too much of a problem as the survivors will still all be injured. Just go into stealth and pick them all off again.
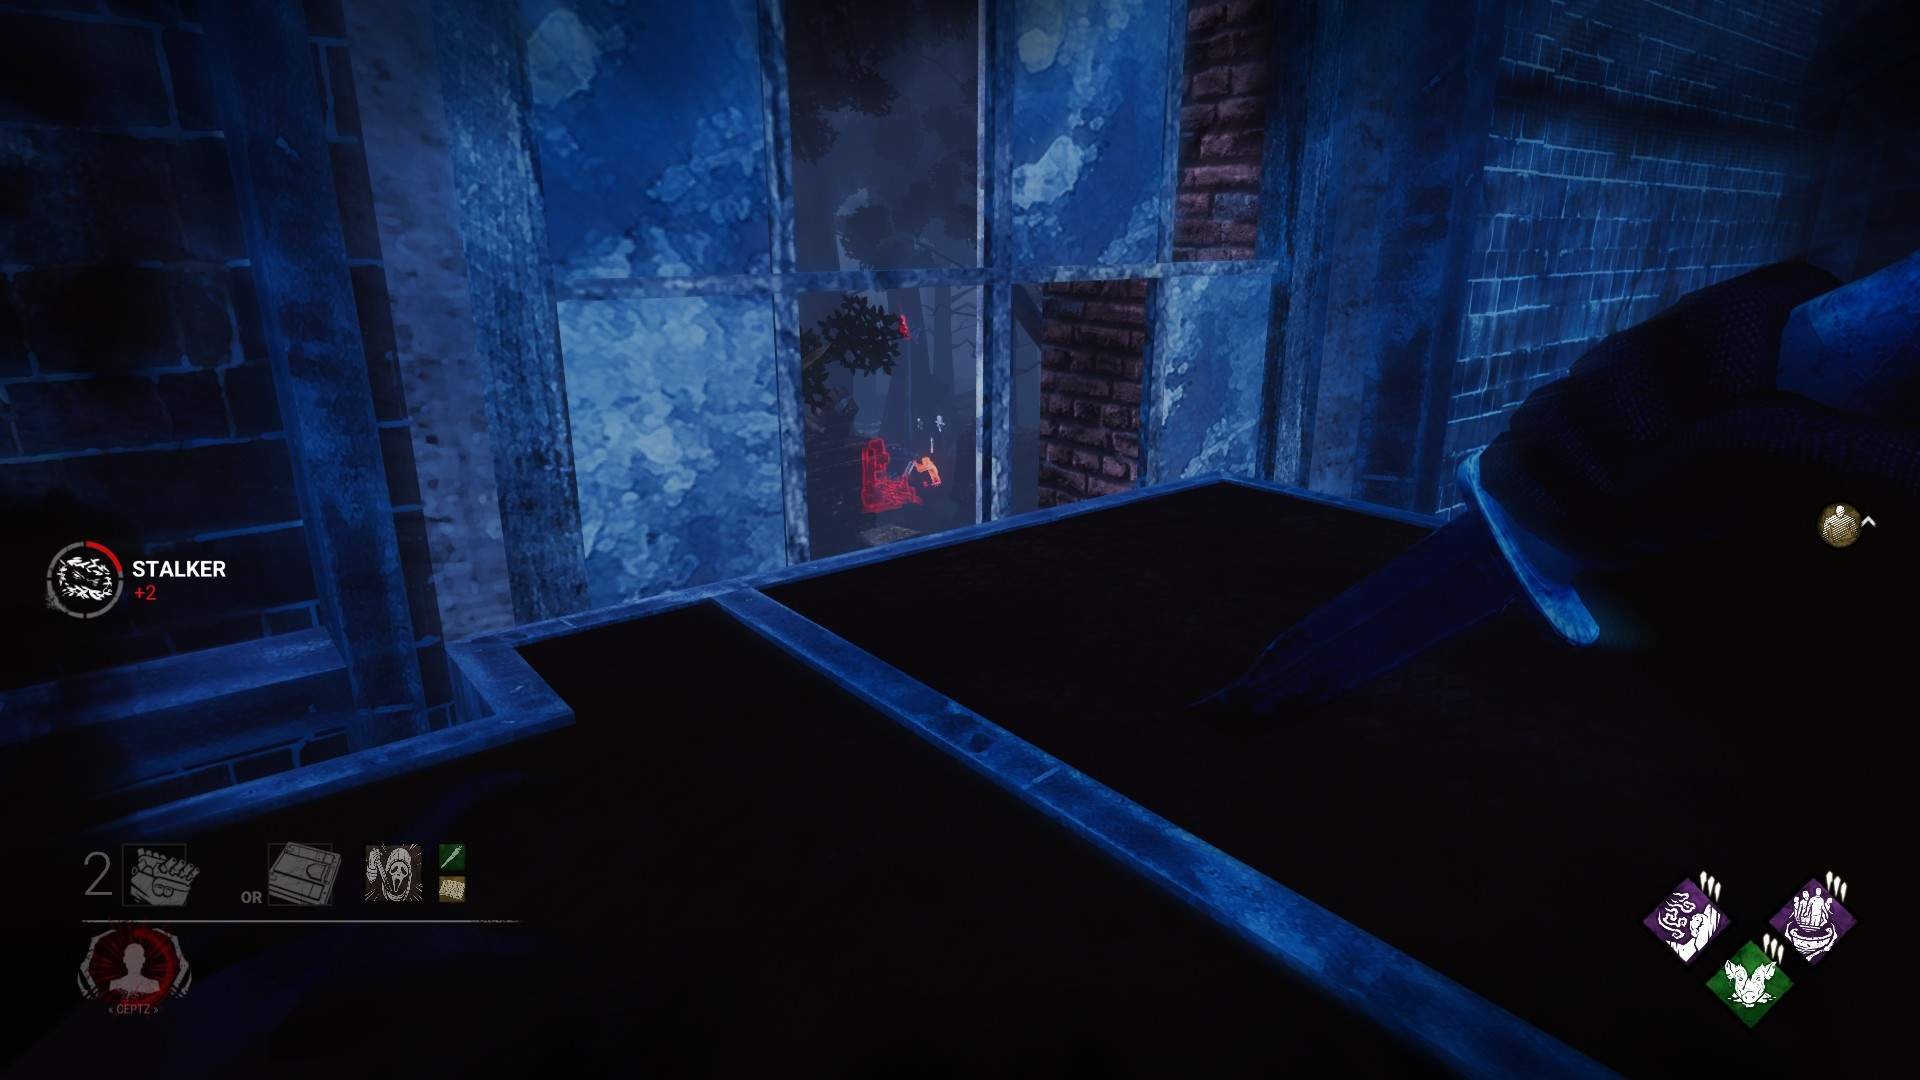
A Compilation of Cheeky Stalk Points
While most of the time you’ll be stalking survivors normally, there’s always a chance you’ll be noticed, there are several locations in the game where you can stalk with a little to none chance of being noticed. A lot of these places counter strong loops while others aren’t AS useful, but all of these are nonetheless extremely satisfying to pull off. This mainly provides insight on how strong stalking can be.
Here’s a compilation of many of these locations. The red glowing survivor indicates that they’re able to be stalked there.
General Tips and Tricks
- Don’t crouch-walk across the map, you move really slowly. Save it for when you need to cross open areas.
- Although I mentioned that Ghostface has little chase potential, there are still some things you can do, like going into stealth while chasing a survivor in a structure that blocks line of sight, such as a Jungle Gym. However, be careful not to get stunned by a pallet as you’ll lose your stealth. You can also employ the crouch method I mentioned earlier, but only at certain types of loops.
- You should play pretty defensively when stalking: always prioritize hiding instead of stalking survivors who are able to reveal you.
- You can stalk a person face-to-face (i.e. stalk them while they’re breaking you out) and still mark them if their stalk bar is already about ¾ full (without addons). Try to stalk survivors to at least this amount before actually marking them.
- If someone’s going to a powerful loop, just stalk them and leave them for now, even if they’re injured. You’ll usually end up getting them later.
- If you down a survivor, sometimes you’ll see another survivor who you won’t be able to hit. Lean-stalk them if you can; you’ll probably get revealed by the downed survivor but not before accumulating a hefty bit of stalk on the other survivor.
- If you down a person and already have your power fully charged, sometimes it might be better to leave them slugged and go stalk and down someone else who’s far enough away that they don’t know you’ll be coming. You shouldn’t be doing this all the time, but you also shouldn’t instantly hook everyone you down. This way you can catch other survivors off guard rather than when they’re nearby and waiting to unhook their teammate.
- If you accidentally mark someone too early, don’t chase them if they’re in a safe area. Just let them go and move on. On the other hand, if you fail to expose someone before they reveal you, sometimes its better to hit them, even if they’re at 99% stalk. You judge if it’s better to hit them, if everyone else is injured then you probably shouldn’t hit em, as this will let you set up for the snowball I mentioned above. This will happen as you’re learning the killer.
- You can counter Borrowed Time by going into stealth at least a few seconds before a person gets unhooked. Don’t be afraid to do this for fear of being labeled a tunneler.
- If you’re clearly losing, don’t panic and attempt to bumrush survivors. Instead, stay focused and salvage whatever you can from the match.
So that’s basically what you need to know about playing as and against Ghostface. Despite the title, I probably missed some things, so feel free to suggest tips or ask questions.


Be the first to comment