
Tarisland Divine Grace Priest Guide (This means healer)!
Overview
By Lani.
Why Priest?
- Strongest single target heal in the game for a whopping whole 6 seconds out of an entire cycle.
- Strongest AoE heals.
- Best looking.
- Big staff = big heals (One can hope).
- You like suffering but also to bring suffering to others.
- Weakest single target heals in the entire game overall.
- Will wipe entire raids and parties if you use your skills wrong.
Base Stats
| Intelligence | Increases you ATK* by a small amount |
| Crit | Affects crit trigger rate |
| Cooldown | Reduces cast time, cooldown, and global cooldown of skills |
| Omni | Increases Final healing** |
| Focus | Increases healing |
| Stamina | Increases your HP and base HP recovery |
Everything else is irrelevant.
*Attack is your main stat for healing multipliers for Skills. Increasing ATK = Increasing base heal amounts for every skill.
**Final healing means the final multiplier calculation that happens after everything else has been counted; Crit, ATK, Buffs etc. Omni adds a flat % increase to the whole sum of everything else.
Stat Priority
You will build large amounts of Intelligence very early on so prioritising it is not as important as other stats.
What you are looking for in gear varies per piece, but your main priorities should be:
- Crit/Focus > Cooldown > Intelligence > Omni and NEVER Stamina.
We will get more into these stats later as every piece can roll different sets of stats, so this priority is only something to give an idea about what you are looking for.
You never want to have Stamina in your gear as we do not need extra HP and it is blocking way more important stats like the ones above.
Stamina is for Tanks. If you are tanking you need to fire your actual Tank and look for a new one.
Skills
Prayer

Your main single target heal or damage spell. This will be your main skill for proccing passive synergy towards the other skills.
- 68% of ATK + 148 halved as damage to enemies.
Recover

Single target heal over time spell for 6 seconds or damage for 6 seconds to enemies.
- 70% of ATK + 148 and 36% of ATK + 79 every second for 6 seconds halved to enemies.
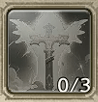
Light Wave

Single target area effect spell healing the lowest HP party member. Upgrades to Divine Blessing when all Wings are lit up.
- 54% of ATK + 114 every second for 6 seconds.
Light Healing

Your main AoE heal, strongest instant heal, and one of the strangest heals in the game. Has a maximum stack amount of 2.
- 213% of ATK + 456.
Holy Guardian

Single Target damage reduction, and Physical DEF buff. Reduces damage taken by 40% and increases Physical DEF by 695 for 6 seconds.
Hymn of Light

Priests ultimate skill. Strong channeled AoE heal that cancels if you move or jump. 6 strong heal AoE over 5.5 Seconds during the full channel.
- 237% of ATK + 507 per pulse.
Main Mechanic
Holy Wings

Every time you cast Recover or Light Wave, one wing lights up on your Holy Wings. Once this reaches 6 wings it will be ready to activate.
Holy Wings (Ready to Activate, 6 Wings Lit Up)

Once 6 wings have been lit, the Holy Wings will start to glow indicating you can now cast Divine Blessing, which Light Wave has upgraded to.
Please note, once Holy Wings are Ready, you can no longer cast Light Wave as it has been upgraded to Divine Blessing on your bar.
Divine Blessing

When Divine Blessing is available, your Light Wave will upgrade into this glowing icon showing you can use the skill.
Divine Blessing is an extremely strong Single Target heal when used correctly. It will heal the target for a set amount, then grant them the Divine Blessing buff. Every time the target gets hit during this buff, they get healed. The buff lasts for 6 seconds.
- 224% of ATK initial heal + 112% per hit over 6 seconds.
Important note, you cannot gain any wings during Divine Blessing so try not to cast Recover during this time to ensure it will be up when you can gain new wings again.
Inscribed Stone Skill
Important to Learn!
Inscribed Stone Energy

Upon casting Recover or Light Wave, you gain Inscribed Stone Energy. When the bar fills up completely, you will be able to cast your Inscribed Stone Skill.
Inscribed Stone Skill

Using this skill will convert Recover to an AoE heal, but it will NOT convert an existing Recover to AoE, this needs to be a new Recover cast.
At the same time Light Wave is doubled, this also needs to be a new cast. This does not apply to Divine Blessing even though it’s a direct upgrade from Light Wave, only Light Wave gets doubled. So again, plan accordingly.
But you are in Luck, as casting the Inscribed Stone Skill will Instantly refresh the Cooldown on Both Recover and Light Wave, even if Divine Blessing is Active. So essentially you can use Divine Blessing first, then Inscribed Stone Skill and Light Wave right after to have both Divine Blessing and Two Light Waves active.
Meaning you can cast Recover on your Tank, drop Light Wave on the ground. Then instantly activate your Inscribed Stone Skill and do it again.
With this, you will have Recover on your Tank + Recover on Everyone in the party. And not one, not two, but Three Light Waves on the ground healing the lowest HP target in your party.
Healing Priorities and Skill Usage
Prayer

Prayer is your single target “heal”, if you can call it a heal anymore. You can cast it practically 24/7 as we don’t have to worry about mana anymore, and you should.
With Prayer of Light, every time you critically heal a player, you gain a healing buff for 6 seconds. Meaning, as long as you keep casting this on targets that are not 100% hp there is a high chance to keep this passive up all the time. The buff cannot proc from targets that can’t get healed, meaning targets that are already 100% HP.
The Prayer+ passive plays into this as well, as every cast of Prayer has a chance to lower Light Wave cooldown, meaning you should spam prayer 24/7 to proc this, even if you are not healing anyone. Cast it on a full HP tank if anything.
If you are not dealing with any mechanics that need other CDs or Mitigation, keep spamming your Tank with this skill, or any party member.
Always Keep Casting. (If you have carpal tunnel I would advise against this, you may adapt).
Recover

Recover is fairly straightforward, as far as content goes that we have had so far. Put this on your Tank who has aggro, always.
With Swift Guard, every Recover cast reduces the cooldown of Holy Guardian as well since every Recover cast generates a Holy Wing and generates Inscribed Stone Energy.
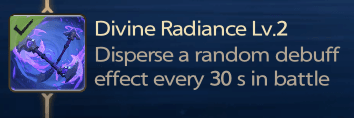
Always cast Recover on Cooldown, never let it sit on your bar waiting to be used. Except, if Divine Radiance is active and it’s about to end. If Divine Radiance is active, you cannot gain Wings.
When you use Divine Radiance, you can cast Recover right afterwards if Recover is up, but if Divine Radiance is already running when Recover comes off cooldown, wait until it is over to cast Recover to ensure you get a Wing from the cast.
When you activate your Inscribed Stone Skill, it will instantly reset Recover’s cooldown.
With this, what you always want to try to do is wait for the next mechanic that requires heavy healing, or if you need a lot of healing due to mechanics failing and everyone is panicking to save the situation. Then you want to cast Recover on your Main Tank, then instantly activate Inscribed Stone Skill and use Recover again as the cooldown resets and now Recover is converted to an AoE heal healing the entire raid, or party.
If you follow this you will have the single Recover up on your Tank plus the AoE heal on everyone else and your Tank.
Try not to waste this, you do not need to use the Inscribed Stone Skill right away when you have enough energy, you can save it for when you do need a lot of healing.
Light Wave

Light Wave plays the same as Recover, but you cannot choose your target. Light Wave will always heal the lowest HP target in the party, otherwise the concept is the same.
Always cast Light Wave on cooldown to gain Wings, Inscribed Stone Energy, and reduce Holy Guardian cooldown with Swift Guard, it will automatically heal whoever is lowest in your party.
With Prayer+ you will also be reducing Light Wave’s cooldown on every cast as mentioned above allowing you to gain even more Wings and Inscribed Stone Energy faster.
Same concept applies with Divine Radiance, read above.
Again, same concept as Recover. Activating your Inscribed Stone Skill resets the cooldown, so you want to play this the same way.
Use Light Wave/ Divine Blessing first, then pop your Inscribed Stone Skill to use Light Wave again to multiply it.
Note, even though there are three, or two Light Waves if you casted Divine Blessing first, they will follow the same design. All of the Light Waves will heal the Lowest HP target in the raid.
You also can use this in case your Tank is taking extremely heavy damage and you and your co-healer cannot keep up, or they are dead. As your Tank will most likely be the Lowest HP player in the raid at that time, the Light Waves will heal them for large amounts very quickly.
When you have multiple Light Waves active you may as well consider them an AoE heal as they will top up every low HP player extremely quickly one by one.
Use this the same way as Recover above, only when needed. As you can, and will save the day with the insane amounts of healing Inscribed Stone Skill activation gives you for a short burst.
Light Healing

Light Healing is your Strongest Heal that is on a normal cooldown on your bar.
The skill is simple, but rules exist that you should not ever break.
As it is your highest AoE heal with a fairly short cooldown compared to Hymn of Light, you need to focus this skill on Party Wide damage.
Meaning, DO NOT use this to heal a DPS who got hit because they were in the wrong spot. If you do this, you will find out you actually needed this skill for the next Party Wide damage attack and now you don’t have it anymore. Never use this skill to cover for one or two DPS getting hit by random stuff.
I keep writing DPS, and there is a reason for that. You may use this skill to heal a Single Tank if you Know they might get one shot by the next hard hitting skill made by the boss and you need to heal them Right Away. These cases are Rare, but they might happen.
Otherwise, learn the fights you are healing, and save this spell for Party Wide damage as you can heal tanks with your kit fairly efficiently.
Holy Guardian

Holy Guardian is your only mitigation skill, and it should be used exactly as that, mitigation.
This means do not use it on a Tank who is not getting hit by anything. Use it on a tank that is getting hit by the next heavy hitting attack, or they are low HP to boost their survivability so you can heal them up easier as they are now taking less damage for 6 seconds.
Holy Guardian also works extremely well on tanks who are on add duty as it reduces damage taken by 40%.
If you are running 2 priests in one raid, please coordinate with your co-priest to rotate these together for different mechanics. I.e, you can use it on the first add spawns, and the other priest uses them on the next one, and so on.
And again, do not use this on a single dps who is failing to dodge mechanics. Save it for when you need it, and throw it on your tank. Or in extreme cases, your co-healer if they cannot survive any other way for some reason.
Hymn of Light

Hymn of Light is your Ultimate skill, it is your Strongest heal but also on the longest cooldown.
This skill should only be used on mechanics where you know you are going to be dealing with very high raid wide damage. Or if your party has failed mechanics and taken too much damage to survive the upcoming mechanic.
Good examples of this would be; Merfolk King Shaman Bubble AoE, Synthesis Doctor add + aoe spam, and Arch Druid 2nd phase AoEs.
If you know a fight has these mechanics, do not waste this skill on healing something you can heal with your other skills.
With Light Harmony casting Light Healing reduces Hymn of Light cooldown, and with the Hymn Light+ passive you can reduce this skill’s cooldown even further to make sure you can have it up for heavy damage mechanics.
This is your Ultimate skill, use and think of it as such. Good planning and usage will allow you to completely reset tricky or bad situations as you can heal the entire raid alone.
Note; You cannot move or jump while casting this so make sure you don’t need to dodge anything for the next few seconds. The worst thing you can do is cast Hymn of Light, move and not even start the cast. The skill goes on cooldown the moment you tap it.
If you just started casting Hymn of Light, your raid needs healing and you are going to get hit, DO NOT MOVE. You can easily take a hit or two while casting Hymn of Light as you will heal right back up again. It is better to keep casting and heal your party than stop and dodge something that would not kill you.
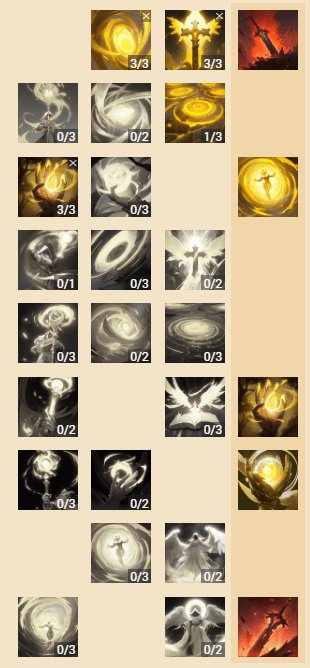
Talents
Priorities
This will give an idea on what you should be focusing on when building your Priest.
We will go more in depth later on in the guide and detail every talent, where they excel at and why you should be using them.
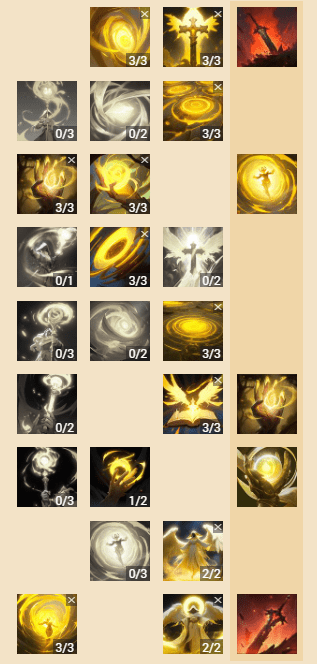
Click to enlarge…
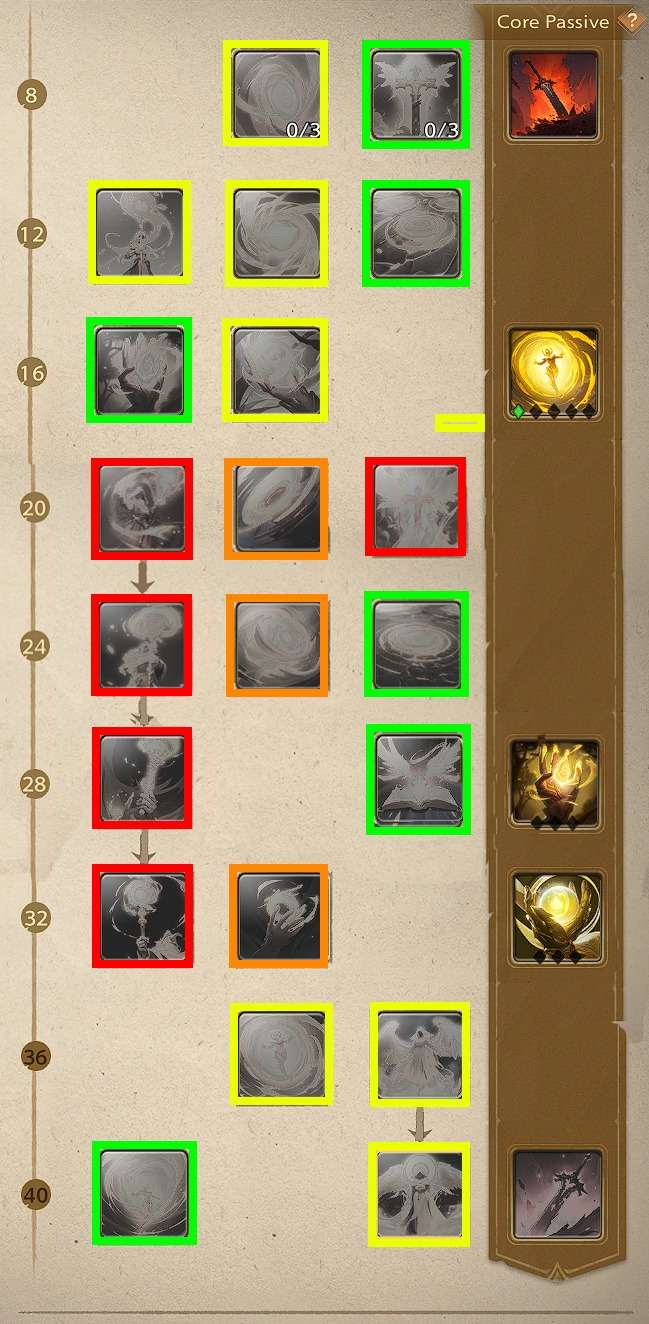
- Green – Must have Talent for Prayer Priest. These are the Core of your Build and should be picked Always.
- Yellow – Pick these if you have more points left over, also important Talents for building your class.
- Orange – These are very situational. Will go more in depth below to when you could pick these. Has value in some scenarios.
- Red – These should not be picked at all, your Talent points are best used elsewhere.
Detailed Explanations
Amp. Recovery

Directly heals towards allies who have Recover heal for more.
This is a decent Talent to pick as most content you will do has AoE damage. And it has good synergy with your Inscribed Stone Skill as it will apply to everyone who has Recover.
Good talent for boosting scenarios where heavy AoE healing is required. And a good buff to keep on your main tank all the time for increasing healing received.
Prayer of Light
Critically healing with Prayer grants a 6 second increased healing buff.
This is your main heal buff talent. When casting prayer continuously on allies that are NOT 100% hp you will keep the buff 24/7 thus increasing your overall healing for every other skill.
Crit Specialization

Increases base crit rate.
Everyone has this by default in the healing spec.
Light Mastery
Increased crit rate.
This talent boosts your crit rate but not by a huge amount.. Take it at least at 40 when you start stacking more crit to reach the passive cut offs.
Recovery+
Base healing and healing over time increased for Recover
Same concept as above but with a weaker effect. The talent only increases Recover on its own. Still has decent synergy for heavy AoE healing with Inscribed Stone Skill. And for keeping Recover on your main tank.
Avatar of Light

When light wave is active, heal crit chance increases.
As Light Wave is one of your main skills, and a lot of synergy for this skill exists, it will allow you to heal for more when you crit. With Light Wave being up most of the time due to Prayer synergy to reduce Light Wave cooldown on Cast.
Light Harmony

Increases Light Healing heals, and every Light Healing cast reduces Hymn of Light cooldown.
This talent boosts the healing for your strongest skill as well as reducing your ultimate cooldown. It’s a must have in Every Build.
Swift Guard

Everytime a holy wing lights up, Holy Guardian cooldown reduces.
This talent is fairly important as both Recover and Light Wave generate Wings, as well as your Mighty Wing talent. Having Holy Guardian up often will make clearing raids a lot easier as the damage reduction buff is very strong and some bosses deal a lot of single target damage to the tanks. Combined with Wide Protection Passive you can reduce the damage taken for your entire raid more often.
Holy Radiance

Everytime Prayer crits, there’s a small chance to apply Holy Radiance to the target.
Passive level increases with Crit % up to 6 times boost. This is fairly straightforward. You need to build your Crit % stat up to gain this talent. For every Crit % step this talent gets stronger. You don’t need to spend any points towards this as you will gain all the levels naturally when you get better gear and stats.
Oracle

Swaps Prayer with Oracle.
We DO NOT use Oracle, ever. If single target healing balancing changes, I will update this. But as of now, DO NOT use Oracle.
Gospel
Increases healing to targets with less than 35% HP.
You will very rarely see people under 35% HP in PvE. Even without this talent healing past 35% is fairly quick and this talent does nothing above 35%. If you are doing PvP however, this talent is a must pick.
Chain Blessing
After every 3rd Prayer, increases healing for Prayer.
With the new single target healing and Prayer scaling changes they have made, Prayer heals for very little on its own and is mainly used as a synergy tool for the other skills. This passive only increases the healing for Prayer, nothing else. Thus should not be taken ever, you can use your points elsewhere.
Oracle Shield

When Oracle crits, target gets a damage reduction buff.
We DO NOT use Oracle, ever. If single target healing balancing changes, I will update this. But as of now, DO NOT use Oracle.
Sacred Sound

When Recover crits, change to apply Holy Radiance to the target.
Not a great talent, you can use your points elsewhere. This talent relies on Recovery and landing a Critical heal. Upon which it grants the target a stack of Holy Radiance which will heal for a fairly small amount when the target gets hit.
Light Wave+

Increases Light Wave healing and converts expiring Light Waves to a small AoE heal.
As we can have Light Wave up very often, increasing its healing is a very good pick. This talent also converts the Light Wave to a small AoE heal to nearby allies. A small Light Healing if you will. It also applies to Every Light Wave you have placed on the ground.
Divine Oracle

Oracle casting time reduced when Divine Blessing is active.
We DO NOT use Oracle, ever. If single target healing balancing changes, I will update this. But as of now, DO NOT use Oracle.
Prayer+

Increases Prayer healing and has a chance to reduce Light Wave cooldown on every cast.
This is one of your main Synergy talents that is a Must pick for Prayer builds. It is not much for increasing Prayer healing, but it is mainly for reducing Light Wave cooldown as with this talent Light Wave will be up most of the time.
Fast Recovery

Increases Recover tick speed and every Recover cast reduces Light Healing cooldown.
Passive level increases with Cooldown % up to 2 second cooldown reduction per cast. One of the best passives to have as every Recovery cast reduces your strongest skill’s cooldown. When you reach rank 3 you will reduce Light Healing CD by 2 seconds every Recover cast. You get this by gaining Cooldown % stat. You don’t need to spend any points towards this as you will gain all the levels naturally when you get better gear and stats.
Oracle+

Increases Oracle crit rate and healing.
We DO NOT use Oracle, ever. If single target healing balancing changes, I will update this. But as of now, DO NOT use Oracle.
Wide Protection

Grants Holy Guardian to all nearby allies with a smaller %.
This passive converts holy guardian to an AoE guard skill, however with a smaller % than the selected target. This has good synergy with Holy Guardian+ as it will apply the healing for everyone, but reaching that talent takes some time. So right now this passive is not a high priority unless you are struggling to keep the party alive during AoE heavy fights.
Holy Guardian+

Increases Holy Guardian duration and grants a heal over time to the target.
Passive level increases with Omni % up to 30% of ATK heal per second. This passive is a good addition to Holy Guardian especially for fights where there is constant heavy damage that might be difficult to deal with otherwise. WIth Wide Protection passive the heal will apply to the entire party as well. For this you need Omni % stat which is fairly hard to gear early on, but you will gain enough to get Rank 3 once you get decent gear after 40. You don’t need to spend any points towards this as you will gain all the levels naturally when you get better gear and stats.
Prayer

When Divine Blessing ends, it heals the lowest hp ally for a small amount.
Honestly not a great talent but a good addition to Divine Blessing as Divine Blessing does not heal targets that do not get hit. Apart from the Initial cast heal. Take it if you have points and the fight is single target heavy.
Hymn Light+

Increases Hymn of Light healing and reduces its cooldown.
If you know a fight is AoE heavy, take this every time. This talent gives a good buff to your ultimate and reduces its cooldown. This works great with the Light Harmony passive as well to reduce the cooldown even further. In Raids such as Aslow this would be a good pick as it is heavy on raid wide damage.
Mighty Wing

Critically healing with direct healing spells have a chance of lighting up an additional Holy Wing, and increases Divine Blessing healing.
In most raids, the damage bosses deal to tanks can be very threatening to Priests especially due to our overall low single target healing capabilities, this talent allows us to use Divine Blessing more often and increase its healing at the same time. This is an amazing addition to the spec as Divine Blessing has the potential to be the Best single target heal in the game. Especially in Raids where there are multiple adds and tanks are struggling on survival.
Hymn of Baptism

Hymn of Light makes targets receive more healing for 10 seconds.
Same as above, direct synergy with Hymn Light+ as the very first pulse of Hymn of Light will already proc this on the target, increasing the healing for every pulse afterwards.
Crit Damage Specialization

Increases base crit damage by 10% upon reaching 40.
Everyone gets this when they hit 40.
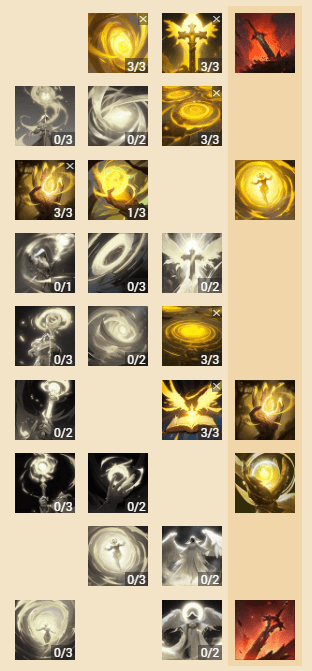
Sample Builds
Using 32 Talent points available
PVE
Click to enlarge…
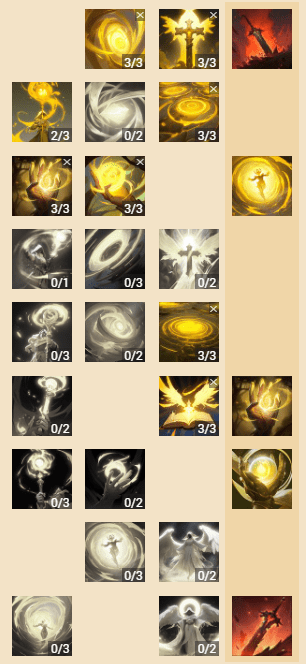
Battleground
Click to enlarge…
Leveling
Level 20
(8+2 Talent Points*)
Level 26
(11+4 Talent Points*)

Level 30
(13+6 Talent Points*)
Level 34
(15+8 Talent Points*)
Level 38
(17+10 Talent Points*)
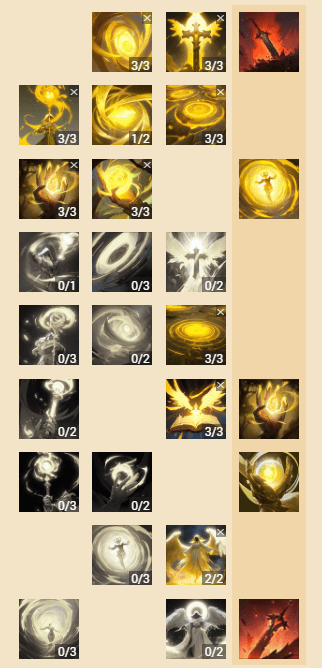
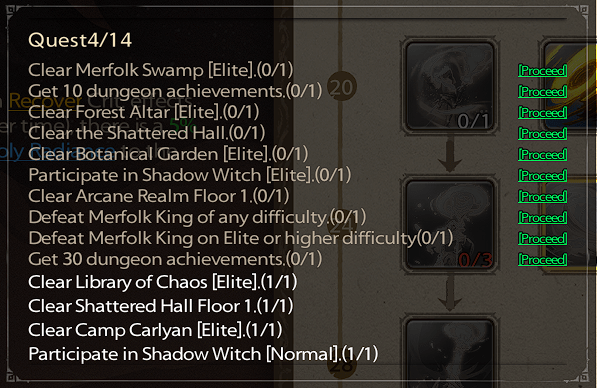
*The extra talent points come from completing quests towards the 7 day login. You can see where you are gaining extra Talent Points from by pressing the + sign in the Skill window:

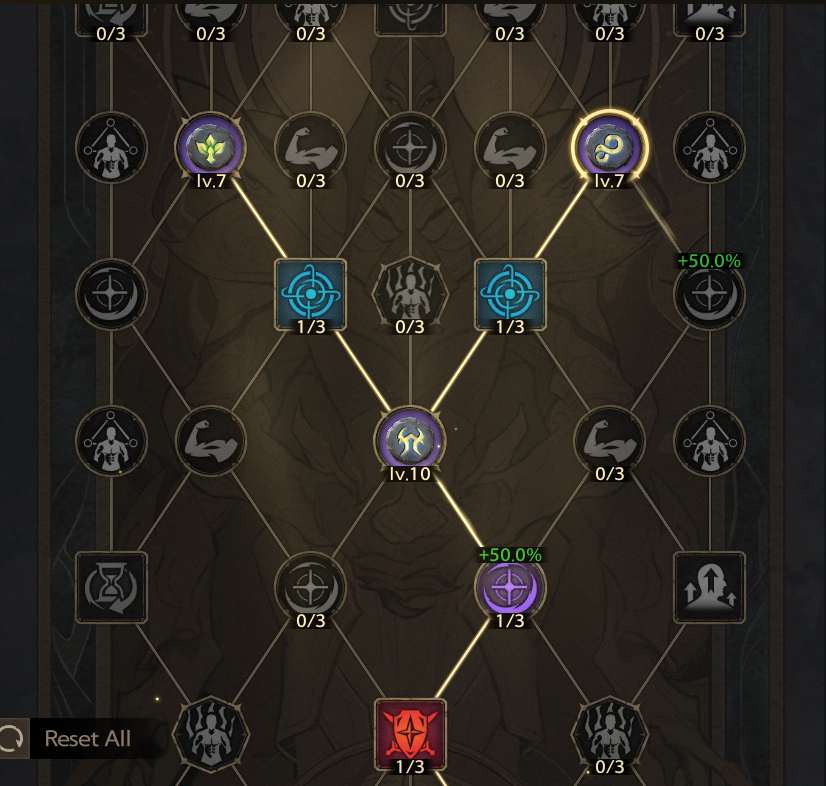
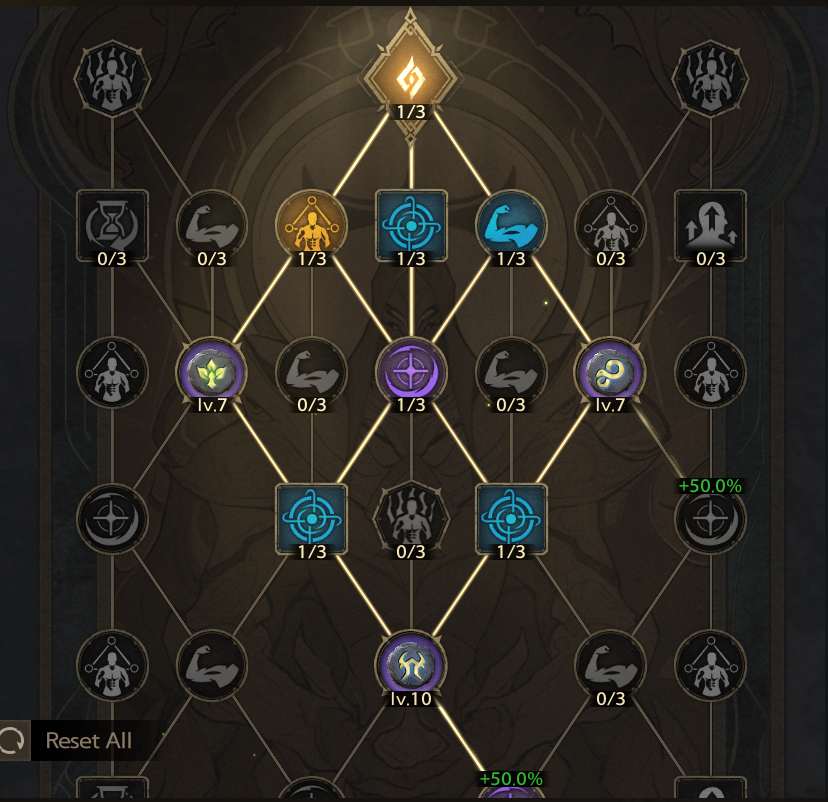
Inscribed Stone
Overview
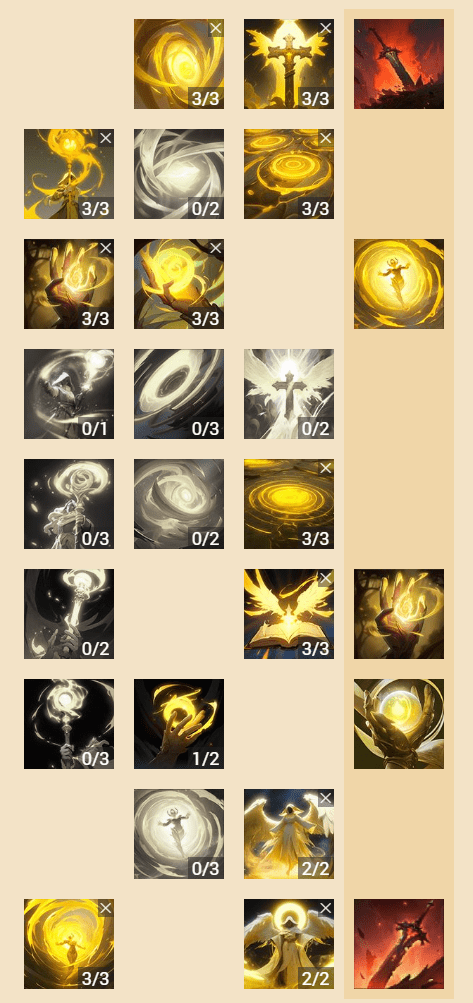
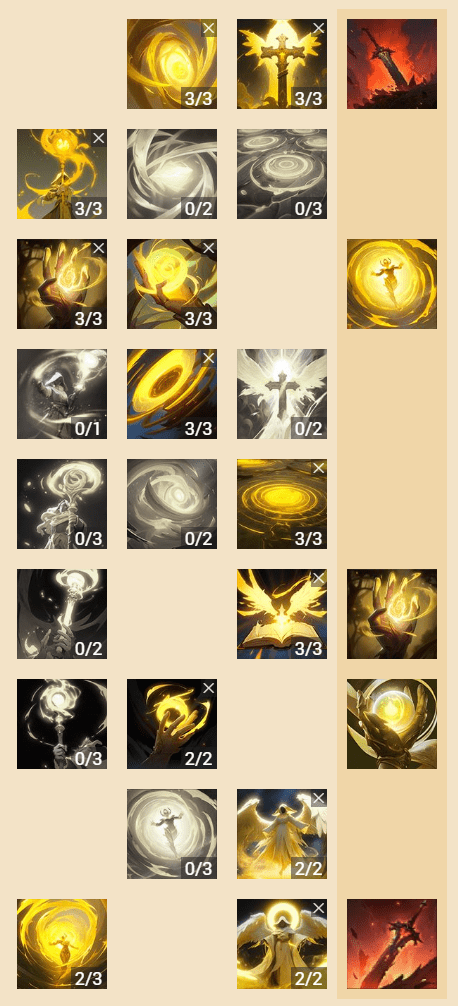
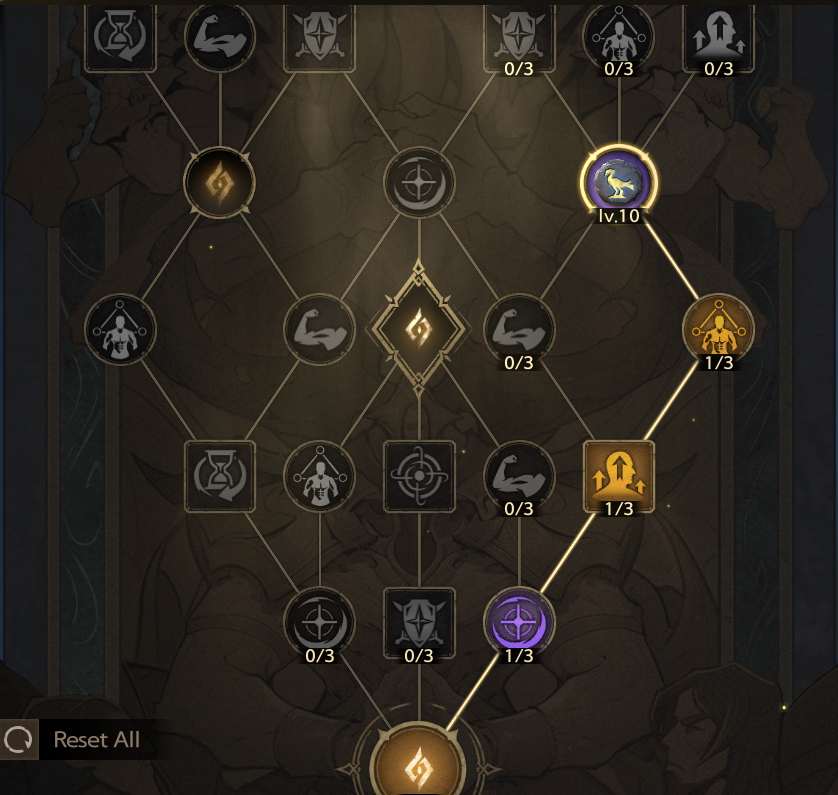
The Path below is the overall one you will want to focus on, in that exact order when leveling up. The Emblems are extremely important for healing, whereas the Echo nodes are not. Echo nodes are important for DPS, as healing is a constant activity we don’t need to rely on Echo bursts that much at all. We can get the Echo nodes later once all the other key nodes have been taken.
The focus points after reaching the last image are Capping every Resonance node you can find, Resonance is the most important stat you can get from the Inscribed Stone tree as it will allow you to gain energy way faster. For example, at 314 Resonance I’m already gaining energy 40% faster. This will allow you to burst heal way more often using the Inscribed Stone Skill.
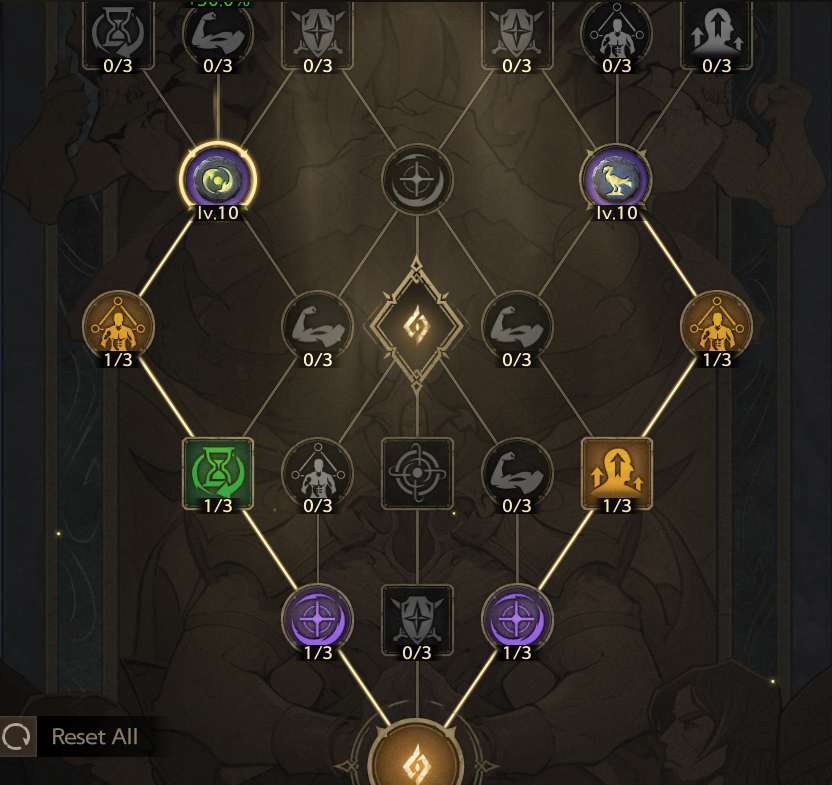
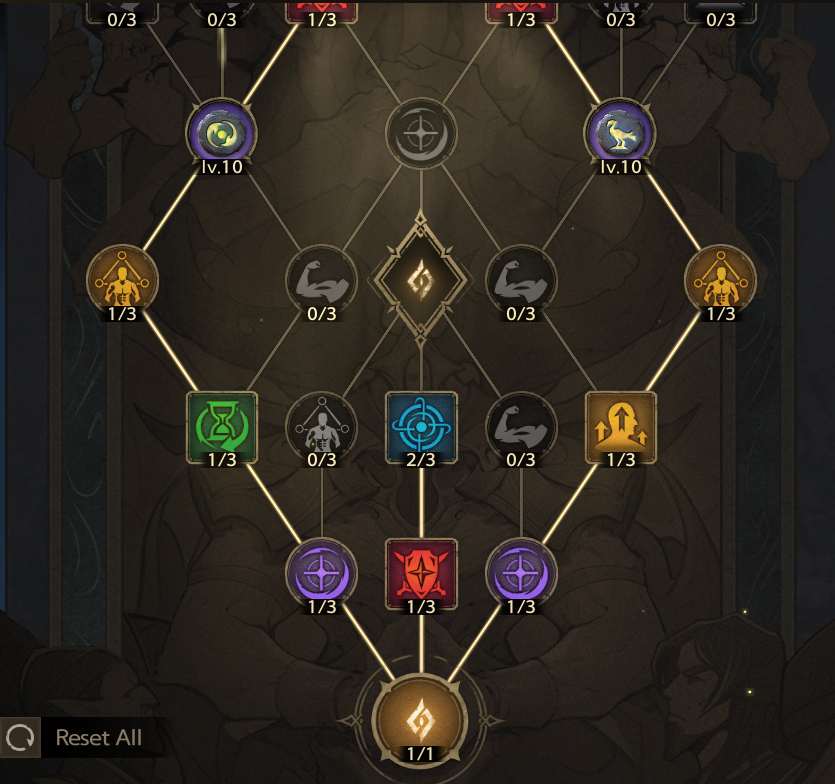
After Resonance nodes have been capped, you may navigate through the board to get the Omni, Cooldown, and Crit nodes while also getting the Echo nodes all to Level 1.
You do not want to get Intelligence or Stamina at all. But if you must go through one to get the more important stats, you can do so. Also the Specialization Effect is not very important as it only increases your Critical Damage.
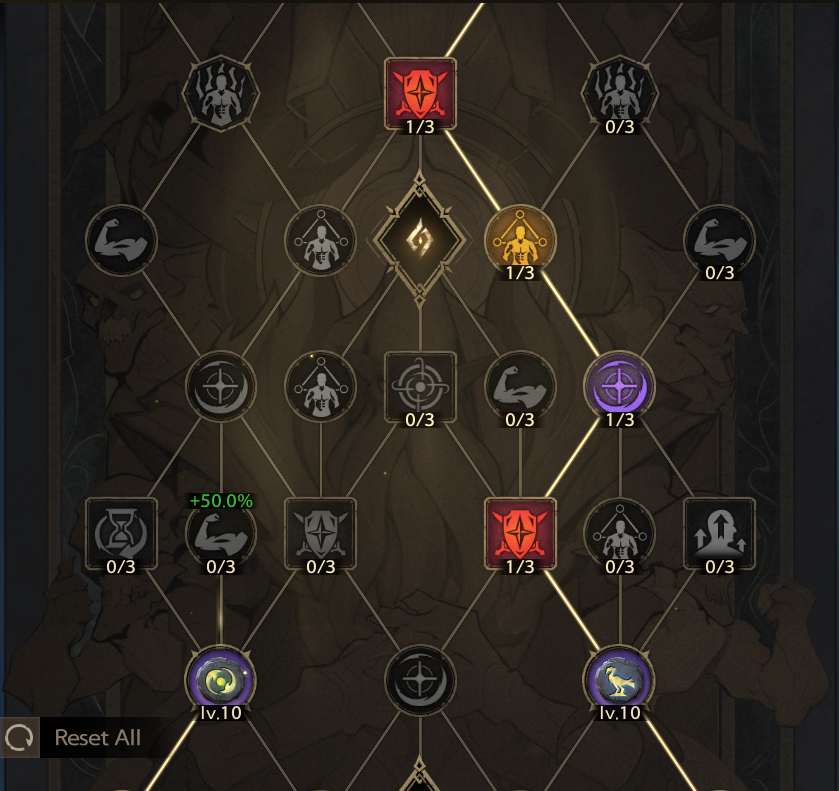
Overall, the stat priority should look like something like this:
- Resonance > > > > Crit/Omni/Cooldown > Focus > Specialization Effect > Intelligence > > > > Stamina
Path
Emblems

- Empowerment one of your two main Emblems that you will use in Every content in the game. This emblem should Always be on your tree. Albeit having a low chance, the emblem can act as a mini single target Light Healing once it procs.
- Special Attribute: If the target’s HP is less than 35%, increases the healing effect.

- Warlike Suge is your second main Emblem that should never leave your emblem slots no matter what content you are running. Each time you use a skill, it has a change to buff your Focus for 10 seconds(Higher if you get +1 skill levels on the emblem). This buff will be up most of the time.
- Special Attribute: Change of Triggering up to 6%.

- Fairly straight forward, this emblem has a constant rotating ATK and DEF buff which swaps every 15 seconds. You can consider this a flat ATK+DEF buff, this should also be high priority when building your emblems.
- Special Attribute: Dual Defense increased by 50%, additionally ATK increased by another 50%.

- This emblem heals you for a set amount and increases your Inscribed Stone Energy every time you use an Ultimate. As Inscribed Stone Energy is important for your big burst heal phases, running this emblem solely to gain it faster is a very good choice. You will generally be using ultimates often in both PvE and PvP so I would recommend using this as a stable emblem in your builds. There are not many reasons to take this one out.
- Special Attribute: Reduces cooldown of all Ultimates.

- Has a low chance to grant a blessing on a target on every direct heal. The blessing heals the target for a fairly small amount if they go below 50% hp. You can theoretically pop this on anyone in the party with AoE healing but still the heal this provides is so little I would not use this over Robustness unless I know the content will not trigger Robustness actively.
- Special Attribute: When Prayer is consumed, add 100 Inscription Energy to the Target

- This Emblem is very conditional and running this depends on the content you are playing. It will increase your ATK and ATK Speed when you heal a target below 35% hp. In some PvE content this will never be proceed, however in PvP this is an extremely good Emblem to run. If you know the content pushes your party members below 35% HP often, you should run this emblem as then it will be up all the time. Also run this emblem when progging new content where people might get hit more often and thus be lower hp. In BG and Arena this is a Must.
- Special Attribute: If the Target’s HP is less than 25%, effect increases by 75%.

- Will give you a stack every time you use a healing skill. At 23 stacks it will heal all teammates for a decent amount and remove all stacks. This has no cooldown, everytime you reach 23 stacks it will trigger the heal. Works well in PvE as you are already spamming prayer anyways. However, the stacks do have an internal delay, even if you spam heals you can only gain one stack at a certain rate.
- Special Attribute: Also adds an additional Damage Reduction shield for 4 seconds upon healing on the targets.
- Editor’s Note: This emblem has an internal cooldown, in reality you need to heal 40+ times before it pops, not good.
You have a very low chance of getting a Special Attribute on a Purple Emblem when you are leveling it to 10. Every emblem has their own Special Attribute and you can only get one.
You may choose 5 of these Emblems to use according to their description and use case, everything else is not worth it or plain un-usable for a healer.
Personally I run Empowerment, Warlike Surge, Intertwined Fates, High Energy Potion, & Robustness pretty much always.
You might also ask “But what about the Stats when we level up the Emblems?”
This is the most frustrating and time / money consuming aspect in the entire game. I can tell you the absolute best stats to get is 3x Emblem’s Skill Level+1 and the Special Attribute on every emblem you get, as it would make the Emblems maximum level 13 and increase the stats it gives by a ton, but this will never happen and you are more likely to get ran over by a car on a fishing boat.
Getting the Special Attribute is fairly rare, but Focusing on getting one would change the game a lot for your healing as they are fairly strong.
If you have not gotten the Special Attribute on your emblem, try to focus on getting At Least One Emblem’s Skill Level+1. If you get more, great, you have won the lottery. What most people will want to get is Emblem’s Skill Level+1 and Node Attribute +% on the Emblem so it will buff the Node stat by a certain percentage.
You want to focus on boosting your Main Stats, boosting Stamina and Intelligence IS NOT WORTH IT. Try to slot your emblems so they boost according to the Inscription stat priority mentioned above.
So your emblem might look like this:
- Emblem’s Skill Level +1
- Lower left node’s attributes +50%
- Upper left node’s attributes +50%
- Special Attribute
Or
- Emblem’s Skill Level +1
- Lower left node’s attributes +50%
- Emblem’s Skill Level +1
- Special Attribute
This would already be decent as long as it buffs the Important stats mentioned above.
You do not want Flat stats on the Emblem additional levels as those are extremely miniscule. Always aim for the Node bonus % or Skill Level, and One Special Attribute
Gearing
Gear, Attributes, & Aptitudes
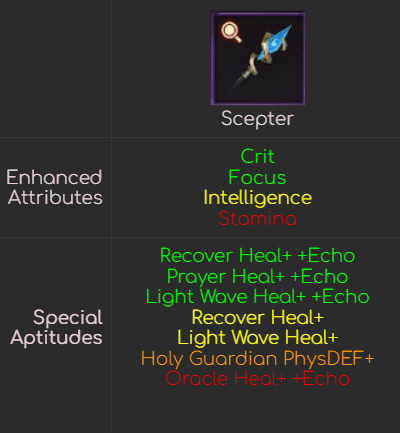
Scepter
Click to enlarge…
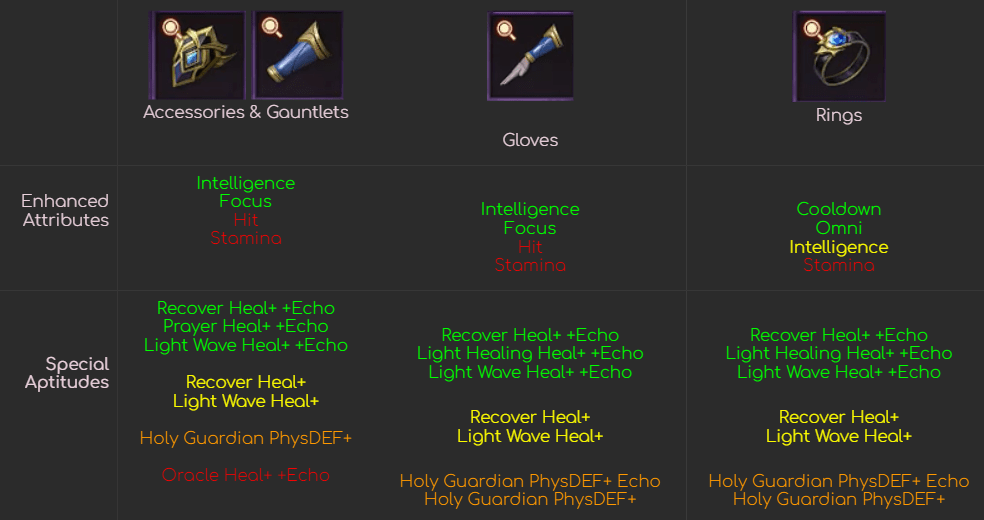
Accessories & Gauntlets / Gloves / Rings
Click to enlarge…
Helmets & Boots / Badge / Shoulders & Capes & Belts
Click to enlarge…
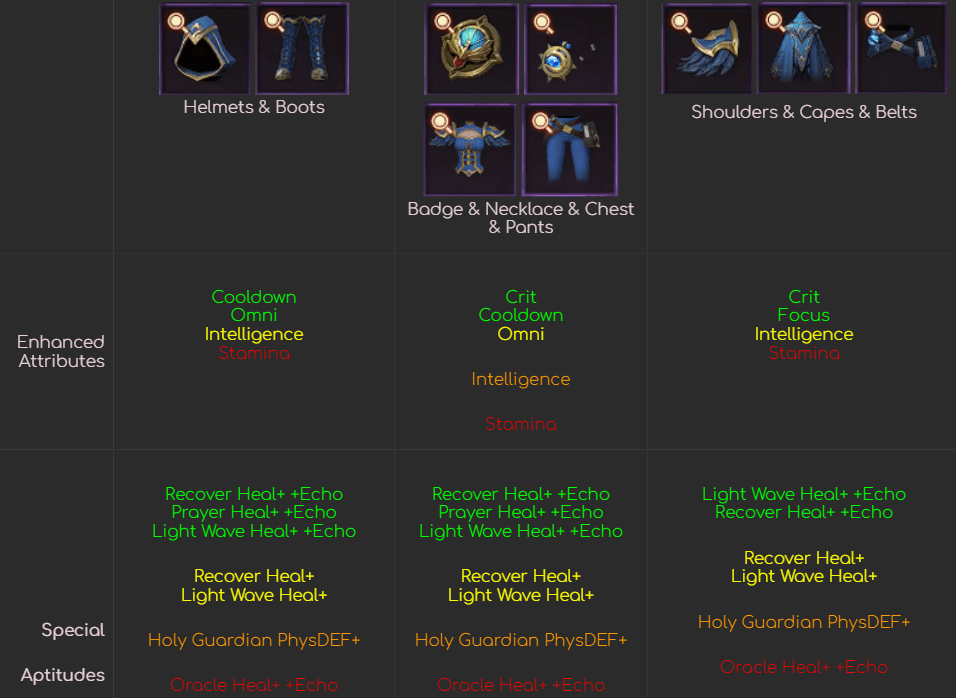
Note: Try not to stack the same aptitude on all pieces. Mix them up.
Example:
- 4 Prayer / 3 Recover / 4 Light Wave has more value than 11 Recover on your gear.
If you are unlucky and do get the same aptitude more than what would be optimal, that is alright as long as it is not Orange or Red.
Try to aim for Green on all pieces, or mix Green and Yellow to ensure there are less of the same aptitudes.
Gems
For gems it is important to at least have your Red and Yellow gems slotted, Blue gems are not super important as a healer but still good to have if you have the extra funds to buy them as well.
Red Gems

For the Red Gems, always try to Prioritize getting ATK gems in All slots. Intelligence scaling will start falling off later on, so ATK is more important.
Yellow Gems

For Yellow gems, later on this will depend on what you are aiming for, but early these should be only Crit.
Even later it is completely fine to only slot Crit on Yellow slots.
Blue Gems

For Blue gems, alway slot Health, this is a very strong stat compared to Stamina, albeit not very important for healers to have.
Colorful Gems
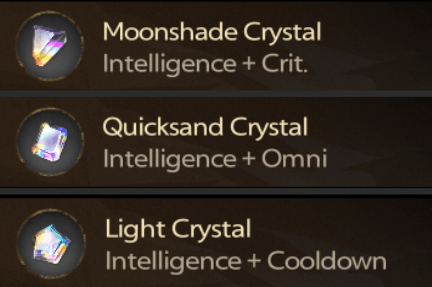
Colorful gems are The Best gems you can get in the game, also the rarest. At first, once you get these gems, always slot them in the Blue Gem slots to not waste useful stats in Red and Yellow gem slots as you can slot Colorful gems in any color slot.
Same rule applies to these as Yellow Gems, get what you need, but prioritizing Crit is good. Or for most people, get what you can when it comes to Colorful gems as these are rare. Generally the goal is to have these in Every slot you have available.
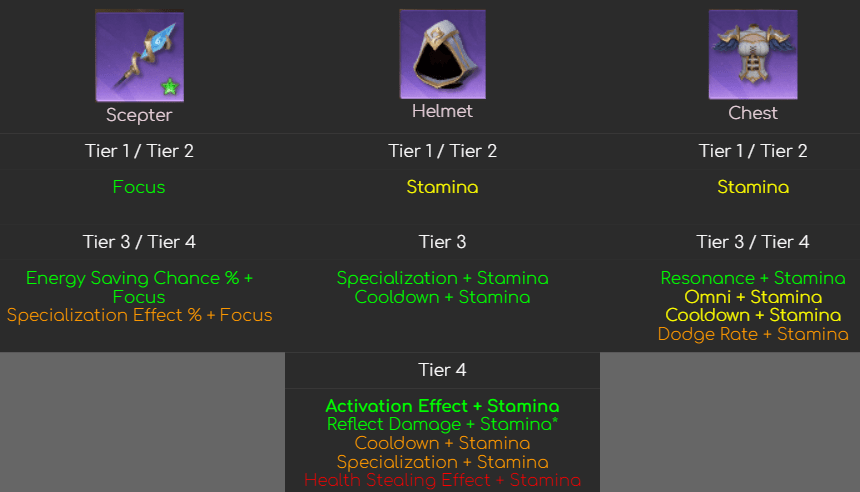
Empowerments
Scepter / Helmet / Chest
Pants / Shoulders / Gloves
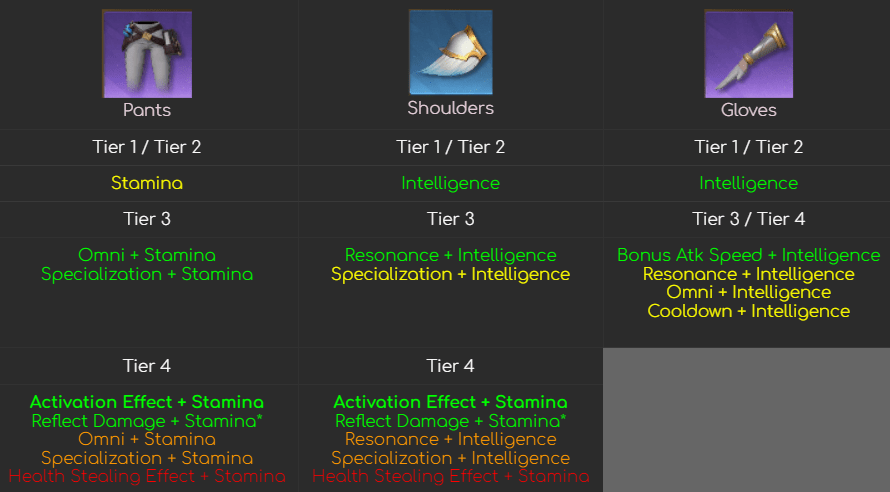
Boots
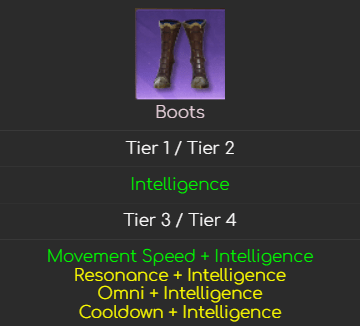
As before, please follow the priority when empowering your gear. Stamina empowerment on gear is not important, these can be skipped completely if you want to save gold.
For Tier 3 I would recommend focusing on Weapon > Boots > Gloves as those give the best effects in the Tier. I would also recommend leaving these three at Tier 3 for a good while.
For the other pieces the Tier 3 effects are not too special but still a good stat increase.
We unlock Tier 3 empowerments “officially” 32 days after launch, albeit these can be crafted at a low chance % 8 days after launch already when crafting Tier 2 scrolls. 32 days after launch we can also proc Tier 4 empowerments which are the best in the game currently.
For Tier 4, we are leaving Weapon, Boots, and Gloves on Tier 3 because the gain from Tier 3 to Tier 4 is not high enough to justify focusing upgrades on initially.
Instead, we will be focusing on getting your Helmet, Shoulders, and Pants. In any order.
The Tier 4 empowerment in these three pieces grants you the “Activation Effect %” stat, which can increase the damage your healed party member does for 6 seconds.
Every piece that has this empowerment increases this buff by 3%, meaning when you have this Tier 4 empowerment on all possible pieces, you will have a chance to grant everyone in your party a 9% damage buff when it procs. (This is also why Prayer rules over Oracle currently.)
Once you have your Tier 4 Activation Effect empowerments ready, then upgrade the rest of your gear to Tier 4 (Weapon, Gloves, Boots) and the rest as your budget sees fit. The chest empowerment should be your lowest priority, but try to get it to at least Tier 3 before starting to invest in Tier 4 empowerments. In other gear.
*Reflect Damage should only be slotted into PvP sets.
Specs for PvP
I don’t play Battlegrounds a lot, but I use the same specs in both Arena and Battlegrounds.
Currently the only Priest healer in Arena ranking Top 10 on our server.
Ultimate Skills
Talents
Warlike Talents


Great guide my friend